Before we start, just a reminder that the Fuel/Electric Vehicles module can be accessed on the Services menu in your Transpoco account.
If you follow the 7 steps below you will be able to integrate your fuel card account and ensure you will have the data to generate accurate fuel consumption reports (we will discuss fuel reports in this article)
Steps:
1) Learn how to integrate your fuel account(s) with your Transpoco account
2) Check your active fuel cards
3) Enter fuel consumption targets
5) How to resolve a fuel transaction with the status “No Station Found”
6) How to resolve a fuel transactions with the status “No vehicle assigned”
7) The fuel transaction verification report
1) Learn how to integrate your fuel card account(s) with your Transpoco account.
1.1 Check if your fuel card provider integrates with Transpoco.
For customers based in Ireland we integrate with the following fuel card providers:
- Applegreen
- Circle K
- Jigsaw
- Maxol
- Morgan Fuels
- DCI
- Fuelwise
For customers based in the UK we integrate with the following fuel card providers:
- Morgan Fuels
- Johnston Fuels branded cards (UK Fuels, Shell & Key Fuels)
- Maxol
If your fuel card provider is not on this list please contact us and we will check if we can integrate with your fuel card provider
Note: If you have more than one fuel card provider you can integrate all fuel card providers as long as the fuel card provider integrates with Transpoco. You will need to contact each fuel card provider separately.
1.2 To integrate your fuel card account you will need send the below email template to your account manager or contact in your fuel card supplier to provide your permission to share the details of your fuel card account with Transpoco. Please copy support@transpoco.com in the email.
'We in ‘customer name’ give authorization for ‘fuel provider’ to setup a fuel card transaction feed for account number __________ with Transpoco'
Authorized by: ‘fleet manager’
Account Name:
‘Fuel provider’ account number:
Primary ‘Fuel provider’ contact:
Primary ‘Fuel provider’ contact email address:
Note: Once you send your fuel card provider an email they will start sending us a daily file with fuel transactions to our FTP site. These transactions are then automatically loaded onto the customer fuel account every 24 hours.
1.3 Enter your fuel card account details in your Transpoco account
The customer needs to open the Fuel module and click "New Account"
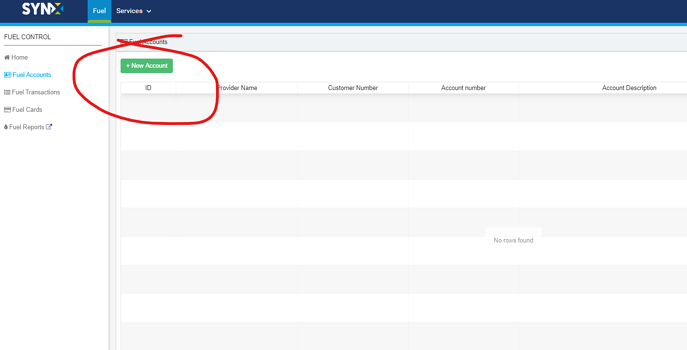
1.4 Add relevant details.

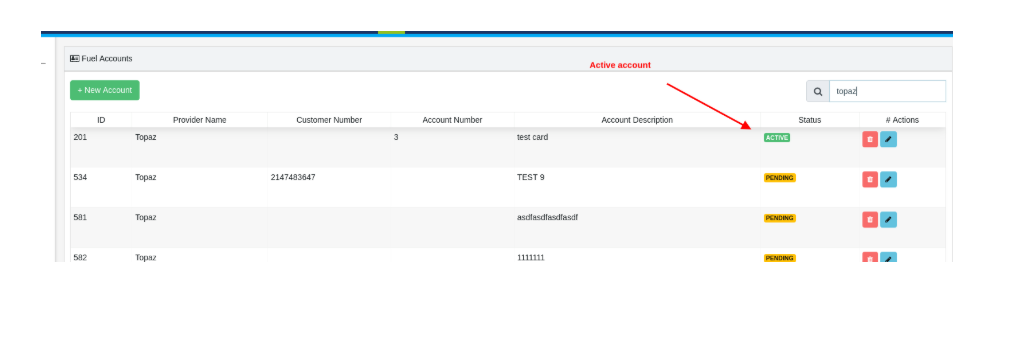
1.5 Once the fuel transactions are sent the status of the account will change to active.
2) Once you have your fuel account(s) set, check your active fuel cards
- You should check if there is any card used by untracked vehicles (vehicles you are not tracking with us)
1.1 Log on to your Transpoco account.
1.2 Click Service > Fuel Card to check your cards details.

1.3 You can manage the Fuel cards now.

Note: Ideally, the number of cards should be the same as the number of vehicles. To help you to track the total cost of fuel you can add untracked vehicle registrations to your Transpoco account. As we will demonstrate in Step 6 you can manually assign a registration to a transaction. If an untracked vehicle was involved in a transaction you can manually assign a registration.
However, untracked vehicles will not appear in the fuel consumption report as we are not tracking these vehicles. Contact the team in Transpoco at support@transpoco.com to add untracked vehicles

b. If you have less cards than vehicles, please contact our Support Team on support@transpoco.com or +353(0)1 90 53 881 and send them the list of fuel cards you want in the system.
2. Ideally, all cards should have the registration that usually “uses” the card in their description. You can manage the card description by double clicking on the text straight away or clicking on the edition button in blue on the “Actions” column
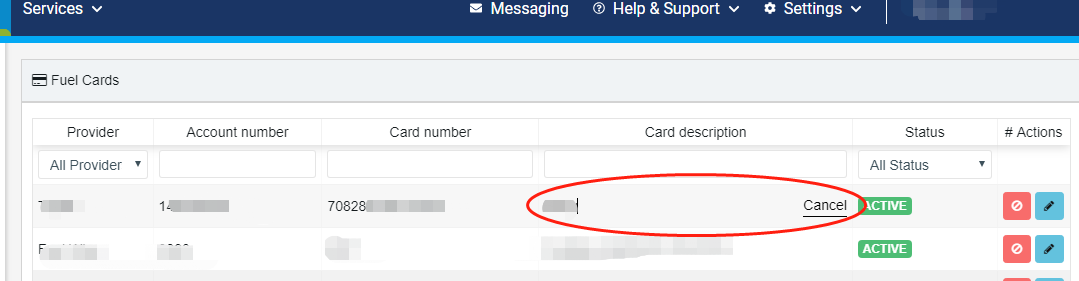
Note: We recommend you to add the vehicle registration to the card description.
If you don’t know cards x vehicle registrations you can also check the fuel transactions per card. You can copy the card number to the “Card Number” column and check the registration in the “Vehicle Assigned” column.

3) Enter Fuel Consumption Targets
Ideally all tracked vehicles should have fuel consumption targets set in the system. You should go to the Vehicles in Settings list and add the target per vehicle. This fuel consumption target will be used to compare against actual fuel consumption in the Fuel Consumption Summary Report.
In the video below we will demonstrate how to enter a fuel consumption target for a vehicle.
Click here to learn more on the Fuel Consumption Summary reports.
Note: If you don’t know the expected fuel consumption for the vehicle, you can check websites like fuelly.com which collects fuel consumption data for a lot of vehicle makes and models. For ROI customer search for L/100km and for GB customers search for G/100miles
4) Fuel Transactions Page
.png?width=688&name=Fuel-Control%20(1).png)
Purchase Time - Time of transaction (data is updated every 24hr)
Account Number - The fuel card used in this transactions belongs to this fuel card account
Card Number - Number of the fuel card used in the transaction
Same Day Purchase - Indicates if a fuel card was used to purchase fuel more than once in 1 day
Card Description - Description the first time card was used (This will be changed to driver EMP number)
Vehicle Declared - The registration declared by the driver at the time of the transaction
Vehicle Assigned - The vehicle that the system has matched to the transaction
.png?width=688&name=Fuel-Control%20(11).png)
Mileage Declared - The mileage provided by the driver at the time of the purchase
Odometer - The mileage tracked by Transpoco at the time of the purchase
Product- Displays the product involved in the transaction
Price per litre - The price per litre
Total Price -The total cost of the transaction
Station Name - The name of the fuel station involved in the transaction
Station Address - The location address of the fuel station
.png?width=688&name=Fuel-Control%20(13).png)
Registration Status:
Reg Ok - The registration declared is part of the fleet
Reg Unknown - The registration declared is unknown
GPS Status:
GPS Ok - We have the declared vehicle at the station at the time of purchase
GPS Unknown - We are unable to match the tracked vehicle to the station
Note: The system assigns the transactions depending on the GPS location (vehicle at the station), with engine OFF, no other vehicles at the station and vehicle fuel type match according to the table below.
e.g.: If a vehicle is Petrol, the system can match Petrol / Others transactions.
Please note that "Others" can be Car Wash, Lub Oil, Anti-Freeze, etc.

5) How to resolve a fuel transactions with the status “no station found”
Transpoco combines the tracking data and the data provided from the fuel card supplier to verify each fuel transaction, we will match a registration to a transaction. In some cases we cannot match a registration. In the next 2 sections we will explain how to resolve transactions which cannot be verfied.
Note: To ensure accurate fuel consumption reports you need to ensure all genuine fuel transactions have been assigned a registration. If a fuel transaction is not genuine then do not assign a registration.
Transpoco has a list of fuel station stations across ROI and UK but as new stations open every week we require some time to update our list. In some cases a fuel transactions will have the status 'No Station found' which indicates that Transpoco have no record of the fuel station.
- Click on the “Fuel Transactions” option


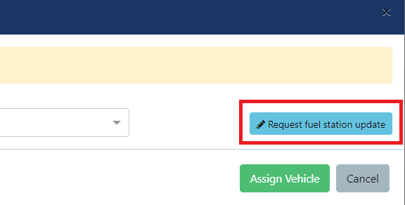
3. If you have any transaction with “No Station Found”, you can click on the yellow button and request a fuel station update clicking on the button from the screenshot below or you can contact our Support Team on support@transpoco.com or +353(0)1 90 53 881.
6) How to resolve a fuel transactions with the status “No vehicle assigned”
Transpoco combines the tracking data and the data provided from the fuel card supplier to verify each fuel transaction, we will match a registration to a transaction. In some cases we cannot match a registration to a transaction and we assign 'No Vehicle Assigned' to the purchase. In this we explain how you can try to resolve these transaction.
4.1 Search for “No vehicles” in the search box under “Vehicle assigned”:

4.2 Click on each “no vehicle assigned” option to analyse the transaction.
Possible scenarios:
1- Two or more vehicles at the station.
The system has found two tracked vehicles at the station at the time of purchase so is unable to automatically match a vehicle to the transaction.
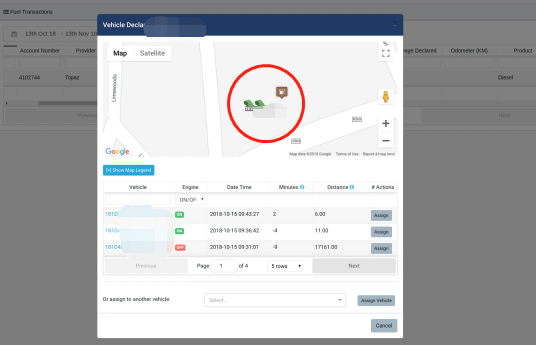
4.3. In this particular case, the fuel card has been used multiple times with one of these two vehicles and the driver never declared the registration.
4.4. So we could only assign the transaction to this vehicle manually.
4.5. Then we would ask you to request the driver to declare registration when purchasing fuel.
Note : If the fuel card description contains the vehicle registration and the registration matches one of the two vehicles at the fuel station then we can manually assign the purchase.
4.6. If you can’t assure what vehicle did the purchase, then choose “Potential Fuel issue” instead of the vehicle registration.
2 - When the registration given at the till is not at the station and there is no other vehicle at the station.
If the selected vehicle was not at the station at that time. Then you need to double check through the Journey Report.
4.3. Copy the Card description(Vehicle reg).
4.4. Click Journey report in Service.

4.5. Then paste the vehicle veg in the Vehicle group.

4.6. Then choose the specific date and time.
4.7. Find the Journey that includes this time slot.
4.8. Click this icon to view the location at the map above to check whether the vehicle was at the station or not.
4.9. After this double check, if the vehicle confirmed that it was not at the station at that time, then go back to the -- Service>Fuel transaction>No vehicle assigned.
4.10. Then choose “Potential Fuel issue” instead of the vehicle reg.
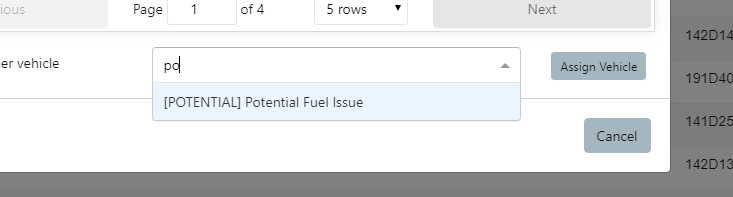
4.11. Then click “Assign Vehicle”.
3- Card description is “0” or “00”.
4.3. We would like to ask you to edit the card description with the vehicle registration, so that the system could assign the vehicle automatically for the future purchases.
4- Tracker not updating.
If the vehicle declared is not tracking so the GPS cannot be verified.

This can be seen from the Red Warning Icon displayed. Hovering over the icon tells that the vehicle has not updated since 14th September.
4.3. Then we need to hide the transaction and repair the unit down with a Hubspot ticket creation for the repair.
4.4. Meanwhile, we need to inform and instruct you to look for our support team notifying the unit is not tracking, so that the system could assign the vehicle automatically for the future purchases.
5- Vehicle not tracked (Unknown registration).
If the vehicle is not part of the fleet or there were no vehicles around the station at the time of purchase or there are no other purchases on the fuel card.

4.3. The user of the card needs to be asked which vehicle was used or check with the customer if we can blacklist the card.
6 - Vehicle with no GPS signal.
If the vehicle had no GPS signal, there would be a yellow sign beside the registration number of that vehicle.

4.3. Then hide the transaction and repair the unit down with a Hubspot ticket creation for the repair.
4.4. Meanwhile, we would like to ask you to block the cards related to untracked vehicles.
7) The fuel transaction verification report
In the Home section of the Fuel module you can check the percentage of transactions assigned to a vehicle registration.
-2.png?width=688&name=Fuel-Control%20(1)-2.png)
GPS Verified (Green) - Represents fuel transactions automatically or manually assigned to a vehicle registration
GPS Not Verified (Red) - Represents transactions not assigned to a registrations; these transactions with either the status 'No vehicle assigned' or 'No station found'.
To ensure accurate fuel consumption reports try to assign a registration to every transaction and achieve 100% verified transactions.
The default option is the last 4 weeks but click View Report to change the time range and to run the report for specific vehicle group.
Now that you have integrated your fuel cards and understand how we match fuel transactions click here to view our article on Fuel Reports.