A Stop is categorised by any time the vehicle’s engine is turned off; the stop ends when the ignition is started. A Stops Report shows the location and duration of every stop made.
Note: If you require more detailed information about how to run the report, see How do I create a report?
- Select the Vehicle(s).
- Select ‘Stops’ from the Reports drop-down list.
- Select the date
- Click on the View Report
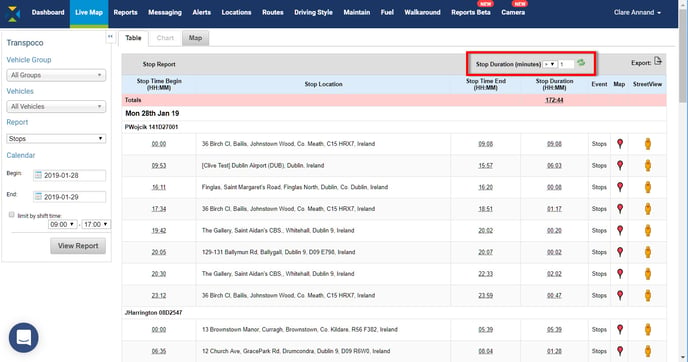
The total stop duration for the fleet (or selected group of vehicles) is in the pink row.
The standard information contained in this report covers the following for each day during the selected period:
- Stop Time Begins: The time (in hours & minutes) the engine was turned off
- Stop Location: Where the engine was turned off
- Stop Time End: The time (in hours & minutes) the engine was turned on
- Stop Duration: Length of time (in hours & minutes) the engine was off
- Event: Engine off
- Map: View the location of the Stop on the map
- Street View: View the location of the Stop in Street View
In addition, the Stop Report can be filtered to only display stops greater or lesser than a certain length of time in minutes. The default is greater than 1 minute.
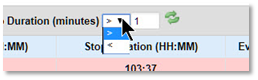
- Click on the down arrow and select either > (greater than) or < (less than).
- Type the required number of minutes in the text box.
- Click on the green refresh icon.
The table will be refreshed with the filtered data.
To export the data as .csv or .xls format, click on the Export icon above the far right column. For more information see How do I export a report?
View all Stops on the map
In Table view, click on the Map The map will include all the stops specified in the Report Generator and Duration filter.
Stops may be clustered on the map when viewing the area small scale.
To scroll backwards/forwards through the stops, click Previous Stop or Next Stop.
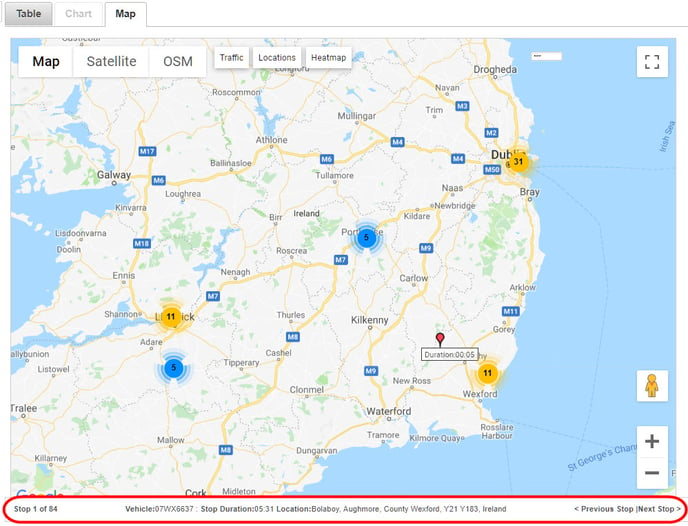
Use the Google tools to zoom in to see the stop locations individually.
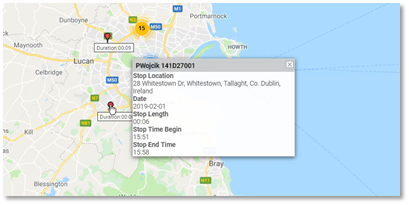
The active stop (usually the first stop) will have a bouncing red pin so it can be distinguished against the others.
To see details of the stop (vehicle/driver, location, date, duration, and stop start and end times), hover the cursor over the red pin and the details will pop up.
To view the map in full screen, click on the Full Screen icon (bottom icon) in the top left-hand corner.
To exit the full screen mode, click on the icon again or press the ESC key on your keyboard.
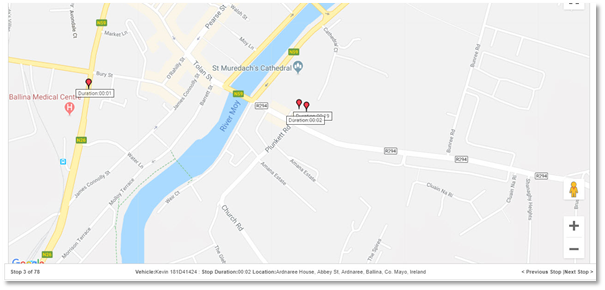
View Stops individually on the map
To view an individual stop location on the map, click the Map icon (red pin) at the end of the row in the table.
The red pin bounces up and down over the duration time, and the vehicle and location details are in the status bar.
Tip: Turning on the OSM layer can give more information about the stop location (in this case, the vehicle has stopped by shops).

To scroll through the stops on the map, click on Previous Stop or Next Stop.
To return to the table view, click on the Table
To view an individual stop location in Street View, click Pegman at the end of the row in the table, or drag and drop Pegman onto the map.
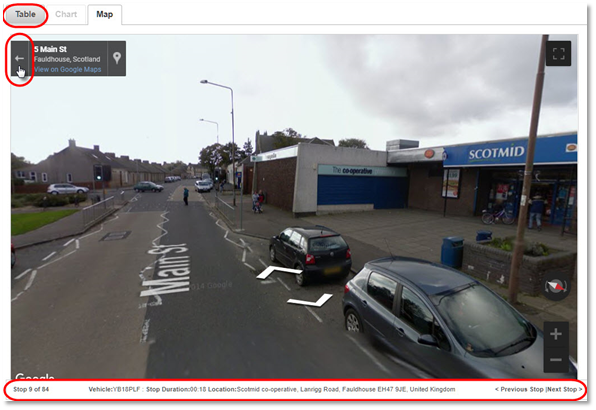
To scroll through the stops in Street View, click on Previous Stop or Next Stop.
To return to the Map view, click the left arrow in the left-hand corner of the screen.
To return to the Table view, click on the Table tab